Angular Tutorial - Tour of Heroes - Part 2 (The hero editor)
Introduction
This tutorial recaps the official documentation at https://angular.io/tutorial/tour-of-heroes/toh-pt1.
The application now has a basic title. Next, create a new component to display hero information and place that component in the application shell.
Create the heroes component
see https://angular.io/tutorial/tour-of-heroes/toh-pt1#create-the-heroes-component
- Use
ng generateto create a new component namedheroes:
$ cd tutorial-angular-tour-of-heroes
$ ng generate component heroes
CREATE src/app/heroes/heroes.component.css (0 bytes)
CREATE src/app/heroes/heroes.component.html (21 bytes)
CREATE src/app/heroes/heroes.component.spec.ts (559 bytes)
CREATE src/app/heroes/heroes.component.ts (202 bytes)
UPDATE src/app/app.module.ts (396 bytes)
ng generate creates a new directory src/app/heroes/ and generates the three files of the HeroesComponent (heroes.component.ts, heroes.component.html, heroes.component.css) along with a test file (heroes.component.spec.ts).
The HeroesComponent class file src/app/heroes/heroes.component.ts is as follows:
import { Component } from '@angular/core';

@Component({
  selector: 'app-heroes',
  templateUrl: './heroes.component.html',
  styleUrls: ['./heroes.component.css']
})
export class HeroesComponent {

}
You always import the Component symbol from the Angular core library and annotate the component class with @Component.
@Component is a decorator function that specifies the Angular metadata for the component.
ng generate created three metadata properties:
- selector - The component’s CSS element selector.
- templateUrl - The location of the component’s template file.
- styleUrls - The location of the component’s private CSS styles.
The CSS element selector, app-heroes, matches the name of the HTML element that identifies this component within a parent component’s template.
Always export the component class so you can import it elsewhere … like in the AppModule.
Add a hero property
Add a hero property to the HeroesComponent for a hero named “Windstorm”.
File src/app/heroes/heroes.component.ts:
export class HeroesComponent {
  hero = 'Windstorm';
}
Show the hero
Open the heroes.component.html template file. Delete the default text that ng generate created and replace it with a data binding to the new hero property.
File src/app/heroes/heroes.component.html:
<h2>{{hero}}</h2>
Show the HeroesComponent view
To display the HeroesComponent, you must add it to the template of the shell AppComponent.
Remember that app-heroes is the element selector for the HeroesComponent. Add an <app-heroes> element to the src/app/app.component.html template file, just below the title.
<h1>{{title}}</h1>
<app-heroes></app-heroes>
If ng serve is still running, the browser should refresh and display both the application title and the hero’s name.

Create a Hero interface
A real hero is more than a name.
Create a Hero interface in its own file in the src/app directory. Give it id and name properties.
File src/app/hero.ts:
export interface Hero {
  id: number;
  name: string;
}
Return to the HeroesComponent class and import the Hero interface.
Refactor the component’s hero property to be of type Hero. Initialize it with an id of “1” and the name “Windstorm”.
The revised HeroesComponent class file src/app/heroes/heroes.component.ts should look like this:
import { Component } from '@angular/core';
import { Hero } from '../hero';

@Component({
  selector: 'app-heroes',
  templateUrl: './heroes.component.html',
  styleUrls: ['./heroes.component.css']
})
export class HeroesComponent {
  hero: Hero = {
    id: 1,
    name: 'Windstorm'
  };
}
The page no longer displays properly because you changed the hero from a string to an object (now showing “[object Object]” instead “Windstorm”).
Show the hero object
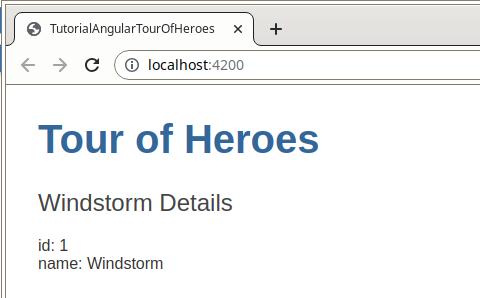
Update the binding in the template to announce the hero’s name and show both id and name in a details display like this:
File src/app/heroes/heroes.component.html:
<h2>{{hero.name}} Details</h2>
<div><span>id: </span>{{hero.id}}</div>
<div><span>name: </span>{{hero.name}}</div>
The browser refreshes and displays the hero’s information:
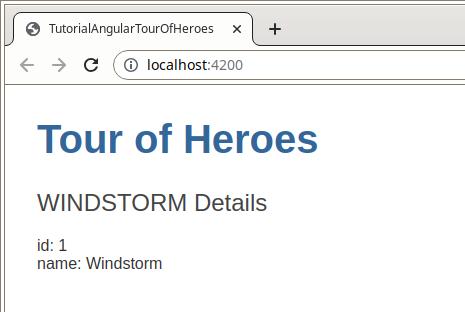
Format with the UppercasePipe
Edit the hero.name binding like this in src/app/heroes/heroes.component.html:
<h2>{{hero.name | uppercase}} Details</h2>
The browser refreshes and now the hero’s name is displayed in capital letters.
The word uppercase in the interpolation binding after the pipe | character, activates the built-in UppercasePipe.
Pipes (see https://angular.io/guide/pipes) are a good way to format strings, currency amounts, dates, and other display data. Angular ships with several built-in pipes and you can create your own.
Edit the hero
Users should be able to edit the hero’s name in an <input> text box.
The text box should both display the hero’s name property and update that property as the user types. That means data flows from the component class out to the screen and from the screen back to the class.
To automate that data flow, set up a two-way data binding between the <input> form element and the hero.name property.
Two-way binding
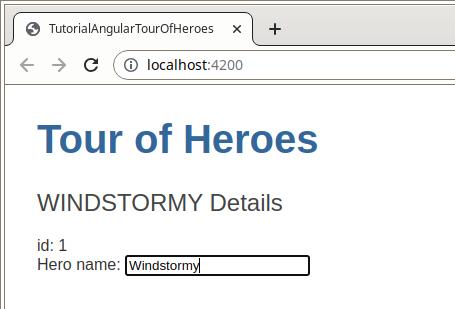
Refactor the details area in the HeroesComponent template src/app/heroes/heroes.component.html so it looks like this:
<h2> Details</h2>
<div><span>id: </span></div>
<div>
  <label for="name">Hero name: </label>
  <input id="name" [(ngModel)]="hero.name" placeholder="name">
</div>
[(ngModel)] is Angular’s two-way data binding syntax.
Here it binds the hero.name property to the HTML text box so that data can flow in both directions. Data can flow from the hero.name property to the text box and from the text box back to the hero.name.
The missing FormsModule
Notice that the application stopped working when you added [(ngModel)].
To see the error, open the browser development tools and look in the console for a message like
Can't bind to 'ngModel' since it isn't a known property of 'input'.

5   <input id="name" [(ngModel)]="hero.name" placeholder="name">
                     ~~~~~~~~~~~~~~~~~~~~~~~

src/app/heroes/heroes.component.ts:6:16
6   templateUrl: './heroes.component.html',
                     ~~~~~~~~~~~~~~~~~~~~~~~~~
    Error occurs in the template of component HeroesComponent.
Although ngModel is a valid Angular directive, it isn’t available by default.
It belongs to the optional FormsModule and you must opt in to using it.
AppModule
Angular needs to know how the pieces of your application fit together and what other files and libraries the application requires. This information is called metadata.
Some of the metadata is in the @Component decorators that you added to your component classes. Other critical metadata is in @NgModule decorators.
The most important @NgModule decorator annotates the top-level AppModule class.
ng new created an AppModule class in src/app/app.module.ts when it created the project. This is where you opt in to the FormsModule.
Import FormsModule
Open src/app/app.module.ts and import the FormsModule symbol from the @angular/forms library.
import { FormsModule } from '@angular/forms'; // <-- NgModel lives here
Add FormsModule to the imports array in @NgModule. The imports array contains the list of external modules that the application needs.
imports: [
  BrowserModule,
  FormsModule
],
When the browser refreshes, the application should work again. You can edit the hero’s name and see the changes reflected immediately in the <h2> above the text box.
Declare HeroesComponent
Every component must be declared in exactly one NgModule(see https://angular.io/guide/ngmodules).
You didn’t declare the HeroesComponent. Why did the application work?
It worked because the ng generate declared HeroesComponent in AppModule when it created that component.
Open src/app/app.module.ts and find HeroesComponent imported near the top:
import { HeroesComponent } from './heroes/heroes.component';
The HeroesComponent is declared in the @NgModule.declarations array (see https://angular.io/api/core/NgModule#declarations):
@NgModule({
  declarations: [
    AppComponent,
    HeroesComponent
  ],
AppModule declares both application components, AppComponent and HeroesComponent.