Angular Tutorial - Tour of Heroes - Part 5 (Add services)
- Introduction
- Why services
- Create the HeroService
- Provide the HeroService
- Update HeroesComponent
- Observable data
- Show messages
- Add MessageService to HeroesComponent
Introduction
This tutorial recaps the official documentation at https://angular.io/tutorial/tour-of-heroes/toh-pt4.
The Tour of Heroes
HeroesComponentis getting and displaying fake data.Refactoring the
HeroesComponentfocuses on supporting the view and making it easier to unit-test with a mock service.
Why services
Components shouldn’t fetch or save data directly and they certainly shouldn’t knowingly present fake data. They should focus on presenting data and delegate data access to a service.
This tutorial creates a HeroService that all application classes can use to get heroes. Instead of creating that service with the new keyword (see https://developer.mozilla.org/en-US/docs/Web/JavaScript/Reference/Operators/new), use the dependency injection that Angular supports (see https://angular.io/guide/dependency-injection) to inject it into the HeroesComponent constructor.
Services are a great way to share information among classes that don't know each other. Create a MessageService next and inject it in these two places.
- Inject in
HeroService, which uses the service to send a message - Inject in
MessagesComponent, which displays that message, and also displays the ID when the user clicks a hero
Create the HeroService
Run ng generate to create a service called hero.
$ cd tutorial-angular-tour-of-heroes
$ ng generate service hero
CREATE src/app/hero.service.spec.ts (347 bytes)
CREATE src/app/hero.service.ts (133 bytes)
The command generates a skeleton HeroService class in src/app/hero.service.ts (and a test class) as follows:
import { Injectable } from '@angular/core';

@Injectable({
  providedIn: 'root',
})
export class HeroService {

  constructor() { }

}
@Injectable() services
see https://angular.io/api/core/Injectable
Notice that the new service imports the Angular Injectable symbol and annotates the class with the @Injectable() decorator. This marks the class as one that participates in the dependency injection system. The HeroService class is going to provide an injectable service, and it can also have its own injected dependencies. It doesn’t have any dependencies yet.
The @Injectable() decorator accepts a metadata object for the service, the same way the @Component() (see https://angular.io/api/core/Component) decorator did for your component classes.
Get hero data
The HeroService could get hero data from anywhere such as a web service, local storage, or a mock data source.
Removing data access from components means you can change your mind about the implementation anytime, without touching any components. They don’t know how the service works.
The service implementation in this tutorial continues to deliver mock heroes.
Import the Hero and HEROES and add a getHeroes method to return the mock heroes in src/app/hero.service.ts:
import { Injectable } from '@angular/core';

import { Hero } from './hero';
import { HEROES } from './mock-heroes';

@Injectable({
  providedIn: 'root'
})
export class HeroService {

  constructor() { }

  getHeroes(): Hero[] {
    return HEROES;
  }
}
Provide the HeroService
You must make the HeroService available to the dependency injection system before Angular can inject it into the HeroesComponent by registering a provider. A provider is something that can create or deliver a service. In this case, it instantiates the HeroService class to provide the service.
To make sure that the HeroService can provide this service, register it with the injector. The injector is the object that chooses and injects the provider where the application requires it.
By default, ng generate service registered already a provider with the root injector for your service by including provider metadata, that’s providedIn: 'root' in the @Injectable() decorator.
@Injectable({
  providedIn: 'root',
})
When you provide the service at the root level, Angular creates a single, shared instance of HeroService and injects into any class that asks for it. Registering the provider in the @Injectable metadata also allows Angular to optimize an application by removing the service if it isn’t used.
To learn more about providers, see the Providers section. To learn more about injectors, see the Dependency Injection guide.
The HeroService is now ready to plug into the HeroesComponent.
Note: This is an interim code sample that allows you to provide and use the HeroService. At this point, the code differs from the final HeroService.
Update HeroesComponent
Open the HeroesComponent class file src/app/heroes/heroes.component.ts.
- Delete the
HEROESimport, because you won’t need that anymore. Import theHeroServiceinstead. - Replace the definition of the
heroesproperty with a declaration.
import { Component } from '@angular/core';

import { Hero } from '../hero';
import { HeroService } from '../hero.service';

@Component({
  selector: 'app-heroes',
  templateUrl: './heroes.component.html',
  styleUrls: ['./heroes.component.css']
})
export class HeroesComponent {
  heroes: Hero[] = [];
  selectedHero?: Hero;

  onSelect(hero: Hero): void {
    this.selectedHero = hero;
  }
}
Inject the HeroService
Add a private heroService parameter of type HeroService to the constructor.
export class HeroesComponent {
  heroes: Hero[] = [];
  selectedHero?: Hero;

  constructor(private heroService: HeroService) {}

  onSelect(hero: Hero): void {
    this.selectedHero = hero;
  }
}
The parameter simultaneously defines a private heroService property and identifies it as a HeroService injection site.
When Angular creates a HeroesComponent, the Dependency Injection system sets the heroService parameter to the singleton instance of HeroService.
Add getHeroes()
Create a method getHeroes() to retrieve the heroes from the service.
File src/app/heroes/heroes.component.ts:
export class HeroesComponent {
  heroes: Hero[] = [];
  selectedHero?: Hero;

  constructor(private heroService: HeroService) {}

  getHeroes(): void {
    this.heroes = this.heroService.getHeroes();
  }

  onSelect(hero: Hero): void {
    this.selectedHero = hero;
  }
}
Call it in ngOnInit()
While you could call getHeroes() in the constructor, that’s not the best practice.
Reserve the constructor for minimal initialization such as wiring constructor parameters to properties. The constructor shouldn’t do anything. It certainly shouldn’t call a function that makes HTTP requests to a remote server as a real data service would.
Instead, call getHeroes() inside the ngOnInit lifecycle hook (see https://angular.io/guide/lifecycle-hooks) and let Angular call ngOnInit() at an appropriate time after constructing a HeroesComponent instance.
import { Component, OnInit } from '@angular/core';

import { Hero } from '../hero';
import { HeroService } from '../hero.service';

@Component({
  selector: 'app-heroes',
  templateUrl: './heroes.component.html',
  styleUrls: ['./heroes.component.css']
})
export class HeroesComponent implements OnInit {
  heroes: Hero[] = [];
  selectedHero?: Hero;

  constructor(private heroService: HeroService) {}

  ngOnInit(): void {
    this.getHeroes();
  }

  getHeroes(): void {
    this.heroes = this.heroService.getHeroes();
  }

  onSelect(hero: Hero): void {
    this.selectedHero = hero;
  }
}
See it run
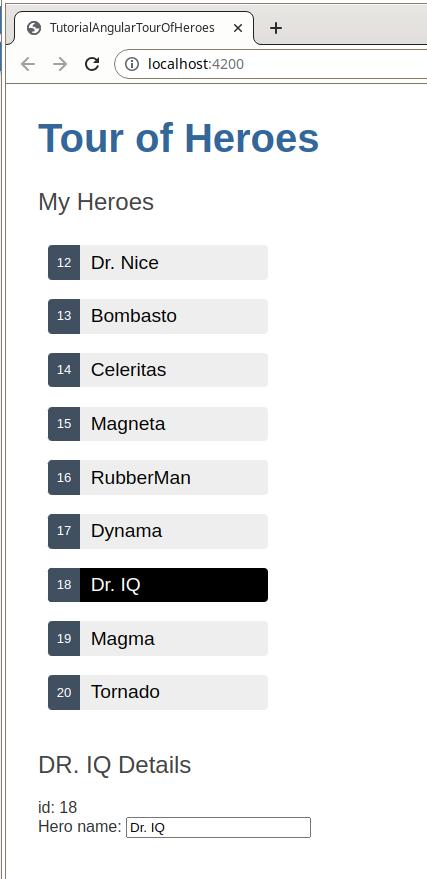
After the browser refreshes, the application should run as before, showing a list of heroes and a hero detail view when you click a hero name.
Observable data
The HeroService.getHeroes() method has a synchronous signature, which implies that the HeroService can fetch heroes synchronously. The HeroesComponent consumes the getHeroes() result as if heroes could be fetched synchronously.
File src/app/heroes/heroes.component.ts:
this.heroes = this.heroService.getHeroes();
This approach won’t work in a real application that uses asynchronous calls. It works now because your service synchronously returns mock heroes.
If getHeroes() can’t return immediately with hero data, it shouldn’t be synchronous, because that would block the browser as it waits to return data.
HeroService.getHeroes() must have an asynchronous signature of some kind.
In this tutorial, HeroService.getHeroes() returns an Observable so that it can use the Angular HttpClient.get method (see https://angular.io/guide/http) to fetch the heroes and have HttpClient.get() return an Observable.
Observable HeroService
Observable is one of the key classes in the RxJS library.
In the later part of the tutorial on HTTP, you can see how Angular’s HttpClient (see https://angular.io/api/common/http/HttpClient) methods return RxJS Observable objects. This tutorial simulates getting data from the server with the RxJS of() function.
Open the HeroService file and import the Observable and of symbols from RxJS and replace the getHeroes() method with the following:
File src/app/hero.service.ts:
import { Injectable } from '@angular/core';
import { Observable, of } from 'rxjs';

import { Hero } from './hero';
import { HEROES } from './mock-heroes';

@Injectable({
  providedIn: 'root'
})
export class HeroService {

  constructor() { }

  getHeroes(): Observable<Hero[]> {
    const heroes = of(HEROES);
    return heroes;
  }
}
of(HEROES) returns an Observable<Hero[]> that emits a single value, the array of mock heroes.
Note: The HTTP tutorial (see later part of this tutorial or https://angular.io/tutorial/tour-of-heroes/toh-pt6) shows you how to call HttpClient.get<Hero[]>(), which also returns an Observable<Hero[]> that emits a single value, an array of heroes from the body of the HTTP response.
Subscribe in HeroesComponent
The HeroService.getHeroes() method used to return a Hero[]. Now it returns an Observable<Hero[]>.
You need to adjust your application to work with that by changing HeroesComponent.
Find the getHeroes method and replace it with the following code. the new code is shown side-by-side with the current version for comparison.
File src/app/heroes/heroes.component.ts:
OLD:
getHeroes(): void {
  this.heroes = this.heroService.getHeroes();
}
NEW:
getHeroes(): void {
  this.heroService.getHeroes().subscribe(heroes => this.heroes = heroes);
}
Observable.subscribe() is the critical difference.
The previous version assigns an array of heroes to the component’s heroes property. The assignment occurs synchronously, as if the server could return heroes instantly or the browser could freeze the UI while it waited for the server’s response.
That won’t work when the HeroService is actually making requests of a remote server.
The new version waits for the Observable to emit the array of heroes, which could happen now or several minutes from now. The subscribe() method passes the emitted array to the callback, which sets the component’s heroes property.
This asynchronous approach works when the HeroService requests heroes from the server.
Show messages
This section guides you through the following:
- Adding a
MessagesComponentthat displays application messages at the bottom of the screen - Creating an injectable, application-wide
MessageServicefor sending messages to be displayed - Injecting
MessageServiceinto theHeroService - Displaying a message when
HeroServicefetches heroes successfully
Create MessagesComponent
Use ng generate to create the MessagesComponent:
$ cd tutorial-angular-tour-of-heroes
$ ng generate component messages
CREATE src/app/messages/messages.component.css (0 bytes)
CREATE src/app/messages/messages.component.html (23 bytes)
CREATE src/app/messages/messages.component.spec.ts (573 bytes)
CREATE src/app/messages/messages.component.ts (210 bytes)
UPDATE src/app/app.module.ts (675 bytes)
ng generate creates the component files in the src/app/messages directory and declares the MessagesComponent in AppModule.
Edit the AppComponent template src/app/app.component.html to display the MessagesComponent at the bottom:
<h1></h1>
<app-heroes></app-heroes>
<app-messages></app-messages>
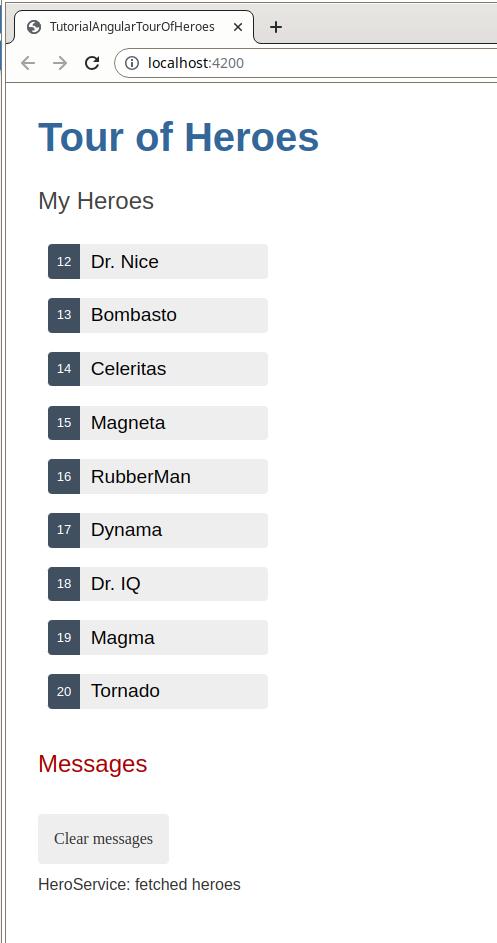
You should see the default paragraph “messages works!” from MessagesComponent at the bottom of the page.
Create the MessageService
Use ng generate to create the MessageService in src/app.
$ ng generate service message
CREATE src/app/message.service.spec.ts (362 bytes)
CREATE src/app/message.service.ts (136 bytes)
Open MessageService in file src/app/message.service.ts and replace its contents with the following:
import { Injectable } from '@angular/core';

@Injectable({
  providedIn: 'root',
})
export class MessageService {
  messages: string[] = [];

  add(message: string) {
    this.messages.push(message);
  }

  clear() {
    this.messages = [];
  }
}
The service exposes its cache of messages and two methods:
- One to
add()a message to the cache. - Another to
clear()the cache.
Inject it into the HeroService
In HeroService
- import the
MessageService - Edit the constructor with a parameter that declares a private
messageServiceproperty. Angular injects the singletonMessageServiceinto that property when it creates theHeroService.
File src/app/hero.service.ts:
import { Injectable } from '@angular/core';
import { Observable, of } from 'rxjs';

import { Hero } from './hero';
import { HEROES } from './mock-heroes';
import { MessageService } from './message.service';

@Injectable({
  providedIn: 'root'
})
export class HeroService {

  constructor(private messageService: MessageService) { }

  getHeroes(): Observable<Hero[]> {
    const heroes = of(HEROES);
    return heroes;
  }
}
Note: This is an example of a typical service-in-service scenario in which you inject the MessageService into the HeroService which is injected into the HeroesComponent.
Send a message from HeroService
Edit the getHeroes() method to send a message when the heroes are fetched.
File src/app/hero.service.ts:
getHeroes(): Observable<Hero[]> {
  const heroes = of(HEROES);
  this.messageService.add('HeroService: fetched heroes');
  return heroes;
}
Display the message from HeroService
The MessagesComponent should display all messages, including the message sent by the HeroService when it fetches heroes.
Open MessagesComponent and
- import the
MessageService - Edit the constructor with a parameter that declares a public
messageServiceproperty. Angular injects the singletonMessageServiceinto that property when it creates theMessagesComponent.
The messageService property must be public because you’re going to bind to it in the template. Angular only binds to public component properties.
File src/app/messages/messages.component.ts:
import { Component } from '@angular/core';

import { MessageService } from '../message.service';

@Component({
  selector: 'app-messages',
  templateUrl: './messages.component.html',
  styleUrls: ['./messages.component.css']
})
export class MessagesComponent {
  constructor(public messageService: MessageService) {}
}
Bind to the MessageService
Replace the MessagesComponent template created by ng generate with the following.
File src/app/messages/messages.component.html:
<div *ngIf="messageService.messages.length">

  <h2>Messages</h2>
  <button type="button" class="clear"
          (click)="messageService.clear()">Clear messages</button>
  <div *ngFor='let message of messageService.messages'>{{message}}</div>

</div>
This template binds directly to the component’s messageService:
*ngIf- Only displays the messages area if there are messages to show.*ngFor- Presents the list of messages in repeated<div>elements.(click)- Angular event binding: Binds the button’sclickevent toMessageService.clear().
Style the messages
The messages will look better after you add the private CSS styles to src/app/messages/messages.component.css:
/* MessagesComponent's private CSS styles */
h2 {
  color: #A80000;
  font-family: Arial, Helvetica, sans-serif;
  font-weight: lighter;
}

.clear {
  color: #333;
  background-color: #eee;
  margin-bottom: 12px;
  padding: 1rem;
  border-radius: 4px;
  font-size: 1rem;
}
.clear:hover {
  color: white;
  background-color: #42545C;
}
Add MessageService to HeroesComponent
The following example shows how to display a history of each time the user clicks on a hero. This helps when you get to the next section on Routing (see https://angular.io/tutorial/tour-of-heroes/toh-pt5).
File src/app/heroes/heroes.component.ts:
import { Component } from '@angular/core';
import { Hero } from '../hero';
import { HeroService } from '../hero.service';
import { MessageService } from '../message.service';
@Component({
selector: 'app-heroes',
templateUrl: './heroes.component.html',
styleUrls: ['./heroes.component.css']
})
export class HeroesComponent {
heroes: Hero[] = [];
selectedHero?: Hero;
constructor(private heroService: HeroService, private messageService: MessageService) {}
ngOnInit(): void {
this.getHeroes();
}
getHeroes(): void {
this.heroService.getHeroes().subscribe(heroes => this.heroes = heroes);
}
onSelect(hero: Hero): void {
this.selectedHero = hero;
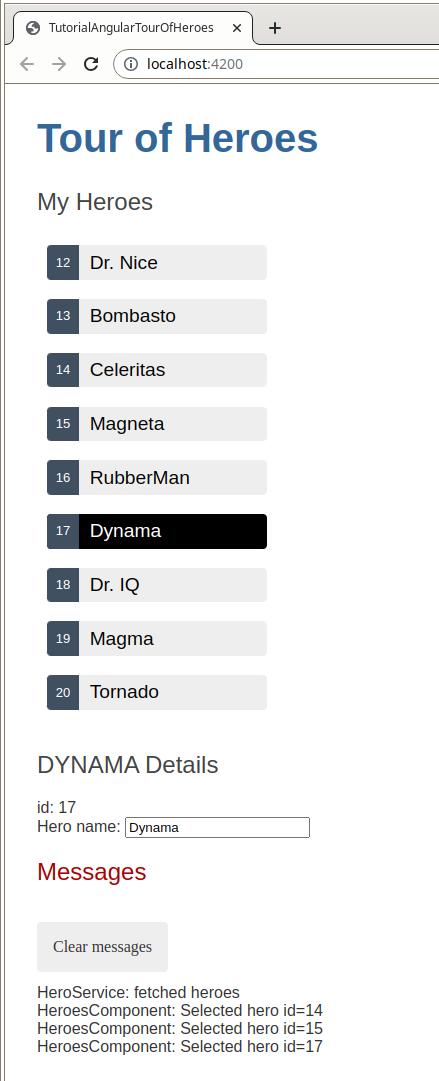
this.messageService.add(`HeroesComponent: Selected hero id=${hero.id}`);
}
}
Refresh the browser to see the list of heroes, and scroll to the bottom to see the messages from the HeroService. Each time you click a hero, a new message appears to record the selection. Use the Clear messages button to clear the message history.